Showing posts with label Canyons EMT. Show all posts

Saturday, January 29, 2011

"It's not a digital footprint, it's a digital tattoo."

EduBloggerCon - Networking/Web 3.0

What is digital citizenship?
I have noticed a shift from simply teaching online safety to teaching digital citizenship. What is the difference? I think digital citizenship is more all-encompassing. It includes online safety (what I think of as the "stranger danger" aspect of digital citizenship), but is a more well-rounded and complete view of what it means to "be online". It addresses safe searching, filters, security, and protecting personal information as well as appropriate content, cyber-bullying, copyright, ethics, social skills, collaboration, affiliation, authorship, and accountability. It is not just acceptable use, but responsible use. Yes, parents and educators need to keep children safe on the Internet, but we need to teach them etiquette and behavior expectations as well, just like we do in the "real world". The virtual world should not be that different from the real world. It's the same people conducting the same business and social interactions, just in a new way.

What is Web 3.0?
At the Networking/Web3.0 session I attended at EduBloggerCon in June, we discussed the idea of "Web 3.0". This discussion focused on the following progression: from The World Wide Web, to Web 2.0, and on to Web 3.0. The World Wide Web was an amazing connection of hypertext and linked documents. Web 2.0 shifted to being of the people, by the people -- interactive and open-source. Web 3.0 has shifted to more than just talk -- we share information and help each other manage and find meaning in the information that is out there.

What does Web 3.0 mean for students, parents, and educators?
Parents and educators have a responsibility to help students understand that there are real people with real feelings behind all the tweets, posts, and avatars.  Every person is a citizen online, just like in the real world. We are all expected to follow rules, laws, and appropriate social behavior in life, so we must do the same online.
What does this mean for school work?
On school networks, no person should ever be anonymous. We should be asking our students to put their name on everything. Being anonymous is like wearing a mask. People behave differently. They feel that because nobody knows who they are, they can do things they would never do normally. They disconnect from their actions and therefore take no responsibility for them. Students should be taught to be responsible for everything they put out there -- every post, tweet, and comment they make. Teaching them to put their name on their work encourages them to take ownership and responsibility for it.

In addition, keeping things anonymous does not allow authorship. It does not allow students to take credit for the great work they are doing. Instead of encouraging anonymity, we should encourage authorship by finding people to comment and share with our students so they can experience the benefits of taking ownership of their work. How? We can use hashtags like #comments4kids on Twitter to get other educators to comment on student blog posts. We can let students know who has viewed their blogs. We can try to get student work published outside of the school -- linked to a local paper or on a public site. (For example, talk to an historian and create a site for the local museum, newspaper, historical society, or library.) We can get outside businesses and associations interested in what our students are doing. (This is mutually beneficial. The students gain an understanding of their potential influence, and businesses gain interest from the "under-30 crowd".) We should be helping students see how far-reaching their online influence can be.
    The Eisenhower school safety project expands on this concept. Check out their blog titled "Generation YES Blog -- Thoughts About Empowering Students with Technology".

    How should educators handle social network sites like Facebook?
    I think that although we do need to be responsible online citizens, we do not want to create fear of social networking and sharing online. We want students to be able to reap the benefits of world wide access to incredible educational resources and social networks. Facebook is the "pizza parlor" or "shopping mall" of today, as the video below says. That means Facebook is also a great way to get announcements, news, educational content, and information out to students and the community. How? Teachers can create Facebook groups or fanpages for their classes instead of friending students. While we do need to be wise and thoughtful about the use of and access to social networks, we should not completely shy away from using them as resources.

    How do we bring the family along for the learning?
    Parents need to be involved in the online lives of their children. They need to help their children learn appropriate online behavior, just as they help them learn appropriate real-world behavior. We as educators can help parents. How? We can start by helping them become educated about digital citizenship. We can help parents understand the Acceptable Use Policy and Information Release Forms they are asked to sign. We can make them aware of available digital citizenship and network literacy resources. For example, UEN has created NetSafeUtah - a collection of movies about Internet safety and citizenship. I watched one NetSafe movie recently that focuses on parent involvement in the online activity of their children:


    Educators should help parents understand what schools are doing with technology, particularly with Internet resources, so they can support our efforts. How? Schools can hold parent openhouse nights to encourage family involvement. They can hold family tech nights at the start of each school year and then again throughout the year on specific technology tools and topics. They can hold classes at various times and in various places for short periods of time to make it easier for busy parents to attend. Some schools even allow parents who do not have computers or Internet at home to have some access to computers and Internet at the school.

    Educators can hold classes for parents where they actually participate in the same types of assignments, projects, and experiences that their children are participating in so they understand what is happening and what the value is. Experiencing what their kids experience can also help parents understand how to help their children with technology issues that arise at home (ie. what to do when you have trouble uploading a file). Have parents comment on each other's posts and projects so they can understand how it feels to interact and receive that kind of feedback. Try sharing class blogs from previous years so parents to see examples of what blogs are for and what can be accomplished with them.

    What about kids who do not have access to technology at home?
    Many educators are finding that it is difficult to press forward with technology use in education when so many of our students do not have the same technology tools and resources at home that they have at school. In public education we cannot require students to use tools unless we provide them. Even if districts can purchase equipment for students, it doesn't help much if they don't have Internet access at home. Here are some ideas our EduBloggerCon discussion group brainstormed to help families access technology and Internet resources at home:

    • Set up a rent-to-own program through the district, just like many districts have set up for purchasing band instruments.
    • Use the free/reduced lunch format to achieve one-to-one access.
    • Buy technology instead of textbooks.
    • Purchase mobile devices that do not require a home Internet provider.

    What are we afraid of?
    There are a lot of questions to be answered and ideas to ponder when it comes to managing and using technology in education, particularly Internet resources. There are many things we need to be wise and thoughtful about. But, it is clear to me that we cannot be afraid of the opportunities presented by the digital world. We should be excited about them! We should be providing our students the training and access they need to succeed and make a difference as digital citizens. The world of technology is their world. We are tasked with the responsibility to prepare them for it. I think I'm about the break into song... "I believe the children are our future. Teach them well, and let them lead the way..." You said it, Whitney.

      Monday, October 4, 2010

      VoiceThread

      VoiceThread - ISTE 2010


      http://edtechvision.wikispaces.com/VoiceThread
      VoiceThread on Twitter: voicethread
      ISTE10's VoiceThread on Twitter: #istevt
      Backchannel: http://todaysmeet.com/istevt

      What is VoiceThread?
      I attended a session at ISTE this summer about VoiceThread that provided me with some wonderful teaching ideas. First, let me explain what VoiceThread is. VoiceThread.com says:
      A VoiceThread is a collaborative, multimedia slide show that holds images, documents, and videos and allows people to navigate pages and leave comments in 5 ways - using voice, text, audio file, image file or video. With VoiceThread, group conversations are collected and shared in one place from anywhere in the world -- all with no software to install.
      To get a better idea of what VoiceThread is, watch the following VoiceThread about VoiceThread:


      Creating a VoiceThread
      The first step in creating a VoiceThread is planning. Before beginning the technical process, be sure to answer the following questions: One: What is my goal? Two: What kind of presentation is this going to be? Once you have decided the direction of your VoiceThread, prepare the media you plan to use in your project. Save all the needed documents, video, audio, and pictures in a file ahead of time so they are ready to be uploaded when the time comes.

      Once you have a plan in mind, the technical process begins. First, you will need to register and create a VoiceThread account. Once you are logged in, you will see the three steps to create your project. Step one: Upload the media you have prepared. Step two: Record your comments. Step three: Share your project. To edit, use the tools located around the VoiceThread's window to alter your project's elements, pages, comments, and settings.

      Visit the VoiceThread support page to find more detailed instructions, answers to frequently asked questions, and helpful hints for creating projects.

      Tips and Suggestions
      There are a lot of things you can do to improve your projects, to make the creation process easier, and to adjust your projects to better fit the needs of your students:
      • You can upload the pictures you plan to use in your VoiceThread onto Flikr and automatically add a folder to your project.
      • Use your computer's built-in microphone or a USB headset to record audio for your VoiceThread.
      • You can input your cell phone number onto VoiceThread, and the site will call you to record your audio.
      • PowerPoints can be easily uploaded onto VoiceThread. Save your PowerPoint slides as jpg files and upload them to your VoiceThread.
      • If you need to include copyright information for photos you have used, you can screen capture the copyright information and upload the image onto your VoiceThread.
      • Record your voice or use video clips to upload to your VoiceThread.
      • Upload a variety of files to your VoiceThread including pdf, docs, etc.
      • You can record up to 15 minutes of audio per slide on the VoiceThread site.
      • The VoiceThread site will automatically scale photos so they fit the allotted space.
      • When recording, to avoid all the classroom noise, you can put a box on the student's head or hold a book up behind the microphone to block out the noise.
      • Allow anyone to view and anyone to comment on your VoiceThreads, but be sure to moderate all comments.
      • If you are concerned about sharing student work, you can opt to not allow your VoiceThread to be shown on the browse list.
      • You can create sharing groups to choose who can view and comment on specific VoiceThreads.
      • You can export your VoiceThread as a .mov file and burn copies for your class.
      • You can subscribe to VoiceThreads that you like.

      Teaching Ideas
      Using technology tools in your classroom can increase student engagement in the learning process and help them connect to the curriculum in an authentic way. Following are some ideas of how you can use VoiceThread in your classroom to enhance student learning. As you read through these ideas, keep in mind that with VoiceThread online discussions can be had with anyone anywhere in the world. Students can interact with classmates, or students and experts far beyond the walls of their school.
      • Asynchronous Debate - Students research, plan, and prewrite a debate speech, then record and upload their speech to VoiceThread. They find images to go along with their speech. Each debate team listens to the opposing speech and then takes five minutes to plan a rebuttle and record it on VoiceThread. Such a debate can be held between various class sections, between different schools, and at different locations.
      • Explorers - Students create slides about different explorers and record information about them. Later, students can compare and contrast the explorers they have learned about on the pages of their class VoiceThread. They can record their findings on their original page.
      • Civil War Simulation - Students record first-person accounts of historical figures from the Civil War.
      • Middle Ages Feudal System - Students post pictures representing all the different classes of people in the medieval social system. They record either a description of their rolls, rights, and lifestyles or mock first-person accounts of their lives.
      • Interview an Expert - Help an expert set up a VoiceThread about their field of expertise. After learning from the VoiceThread, students record questions for the experts to answer. The expert then records answers to the students questions. Finally, the students create a VoiceThread as a report (ie. on an animal), and the expert views the report, listens, asks questions, and makes comments.
      For additional teaching ideas, visit the VoiceThread idea page or simply browse through VoiceThreads that others have created.

      Benefits
      There are many benefits to using VoiceThread in your classroom:
      • Creative Process - Creating VoiceThreads is fun and a great chance for students to be creative!
      • Motivation - Students are often motivated by using new tools and technology to create projects.
      • Collaboration - Students are able to work with a variety of people in their own classroom or from all over the world.
      • No boundaries - Students can communicate with others without the restrictions of time and location.
      • Writing - Those who may not be big writers yet can express themselves through VoiceThread.
      • Speaking - Students who are not yet comfortable with public speaking can get experience with speaking and gain confidence through VoiceThread.
      • Multimedia - Students learn to combine audio, pictures, video, etc. in creative and effective ways.
      • Audience - It is highly motivational to create a project that will be viewed by a real world-wide audience beyond just one teacher or class. A live, responsive audience adds validity and vitality to student work.
      • Feedback - The "conversation" between the creator and viewers of each VoiceThread are invaluable.
      Examples
      Following are some great examples of student VoiceThreads:

      Math Strategies


      Class Art Collection


      Explorer Journals

      Tuesday, September 28, 2010

      PowerPoint/Keynote Presentations

      I recently helped a 5th grade class create basic PowerPoint presentations on Native Americans. The teacher asked me to teach the basics of creating slides for the presentation, then go over a few rules to guide them in creating effective presentations. I found a couple of great blog posts and resources to help.

      First, I wanted to get a good, basic list of presentation tips. Michael Hyatt lists 5 Rules for Better Presentations on his blog. In summary, they are:
      1. Don’t give your presentation software center stage.
      2. Create a logical flow to your presentation.
      3. Make your presentation readable.
      4. Remember, less is more.
      5. Distribute a handout.
      I recommend you take a closer look at his explanations about these 5 tips, particularly the point about distributing a handout. I am not usually a fan of providing paper copies of almost anything, but I do agree with him that providing a copy of your slides at the end of a presentation lessens the stress of those listeners who feel they need to write everything down. Perhaps the compromise it to provide listeners with a link to an electronic copy of your presentation.

      After offering some basics to the students, I wanted to be able to show them some PowerPoint examples, particularly dealing with tip #3. I searched Google for some PowerPoints about PowerPoint. (Side note: For those who are not aware, if you add filetype:ppt to the end of your Google search, all of your search results will be actual PowerPoint presentations.) I found a presentation with examples and non-examples of PowerPoint slides. It reviewed concepts like limiting the number of words on a slide, not over-doing animations, sounds, and color, choosing readable fonts, etc. Click here to download this presentation.

      I am a fan of the Apple iWork software, so I do feel I should mention that Keynote is a great program to use for creating presentations as well. For one thing, I more familiar with Apple menus and navigation. I find my way around Keynote much more easily than in PowerPoint. I also love the animation and movie-making capabilities in Keynote. If you've never given it a try, I highly recommend it!

      Friday, September 24, 2010

      Microorganisms


      A teacher recently asked if I could find some Internet sites that help reinforce the 6th grade curriculum on microorganisms. First I have included the Utah Core Curriculum on microorganisms, then I have listed some of the sites I was able to find:

      Core Curriculum on UEN
      Science Benchmark: Microorganisms are those living things that are visible as individual organisms only with the aid of magnification. Microorganisms are components of every ecosystem on Earth. Microorganisms range in complexity from single to multicellular organisms. Most microorganisms do not cause disease and many are beneficial. Microorganisms require food, water, air, ways to dispose of waste, and an environment in which they can live. Investigation of microorganisms is accomplished by observing organisms using direct observation with the aid of magnification, observation of colonies of these organisms and their waste, and observation of microorganisms' effects on an environment and other organisms.

      Standard 5 : Students will understand that microorganisms range from simple to complex, are found almost everywhere, and are both helpful and harmful.

      Objective 1
      : Observe and summarize information about microorganisms.
      1. Examine and illustrate size, shape, and structure of organisms found in an environment such as pond water.
      2. Compare characteristics common in observed organisms (e.g., color, movement, appendages, shape) and infer their function (e.g., green color found in organisms that are producers, appendages help movement).
      3. Research and report on a microorganism's requirements (i.e., food, water, air, waste disposal, temperature of environment, reproduction).

      Objective 2 : Demonstrate the skills needed to plan and conduct an experiment to determine a microorganism's requirements in a specific environment.

      1. Formulate a question about microorganisms that can be answered with a student experiment.
      2. Develop a hypothesis for a question about microorganisms based on observations and prior knowledge.
      3. Plan and carry out an investigation on microorganisms. {Note: Teacher must examine plans and procedures to assure the safety of students; for additional information, you may wish to read microbe safety information on Utah Science Home Page.}
      4. Display results in an appropriate format (e.g., graphs, tables, diagrams).
      5. Prepare a written summary or conclusion to describe the results in terms of the hypothesis for the investigation on microorganisms.

      Objective 3 : Identify positive and negative effects of microorganisms and how science has developed positive uses for some microorganisms and overcome the negative effects of others.

      1. Describe in writing how microorganisms serve as decomposers in the environment.
      2. Identify how microorganisms are used as food or in the production of food (e.g., yeast helps bread rise, fungi flavor cheese, algae are used in ice cream, bacteria are used to make cheese and yogurt).
      3. Identify helpful uses of microorganisms (e.g., clean up oil spills, purify water, digest food in digestive tract, antibiotics) and the role of science in the development of understanding that led to positive uses (i.e., Pasteur established the existence, growth, and control of bacteria; Fleming isolated and developed penicillin).
      4. Relate several diseases caused by microorganisms to the organism causing the disease (e.g., athlete's foot -fungi, streptococcus throat -bacteria, giardia -protozoa).
      5. Observe and report on microorganisms' harmful effects on food (e.g., causes fruits and vegetables to rot, destroys food bearing plants, makes milk sour).

      Websites:

      Wednesday, April 7, 2010

      CRT Review!

      Have you been wondering how to review with your students for the CRTs in a fun way? Here are the suggestions the Ed Tech and Media Tech teams came up with. Comment and let us know your fun ideas!
      • UTIPS - Create tests on UTIPS for your class to take online. If you need help accessing your account, contact your school's Ed Tech. Click here for a pdf of basic UTIPS instructions.
      • Clickers - Create tests with your SMART clicker software and have your class use the student response system to answer the questions with instant results. Visit the Canyons EMT site for tests that have already been created.
      • Crossword Puzzles - Review vocabulary by having students complete a crossword puzzle containing key content words and definitions. Create your own crosswords and other puzzles, or have your students create their own, at Puzzlemaker.com.
      • Podcast - Have the students create podcasts explaining a math formula or demonstrating a grammar concept. Have them perform and record a skit detailing a science concept. Be sure to set a time to allow the class to watch the podcasts. And be sure to share what you have created with your Ed Tech so we can share your podcasts on iTunesU.
      • PowerPoint Games - Create PowerPoint games like Jeopardy, Who's Smarter Than a 5th Grader, and Hollywood Squares. Find templates for these games at PowerPoint Games.
      • ComicLife - Have your students create a comic strip in ComicLife explaining a difficult curriculum concept.
      • Science Around the World - Prepare science questions for your class and have two students at a time race each other to answer the questions. The student that answers correctly first stays to challenge the next student and earns a "gold coin" for their win. (Other variations: Spelling Baseball, Multiplication Football, etc.)

      Need help trying out these ideas? Contact your school's Ed Tech!

      Thursday, March 11, 2010

      Integrating Technology into the Curriculum

      Online K-12 teacher resources:

      **See also my "Reading and Math Educational Websites" post for a lesson plan outline.

      Thursday, February 18, 2010

      Vancouver 2010 Olympics

      There are some really fun resources and activities on the Vancouver Olympics site, and plenty of unofficial sites with information and activities for kids. Here are a few of them. Feel free to comment and tell me your favorite Vancouver 2010 sites!

      Official Site:
      http://www.vancouver2010.com/

      Mascot Games:
      http://www.vancouver2010.com/mascot

      Kids Activities:
      http://www.kidsturncentral.com/links/2010olympics.htm

      Tuesday, February 2, 2010

      WritingFix

      The literacy facilitator at Midvalley Elementary is an incredible resource if you need help teaching writing. She recently showed me the site writingfix.com, created by the Northern Nevada Writing Project, that contains wonderful resources, ideas, and lesson plans for teaching 6 Trait Writing. We all know the Direct Writing Assessment is rapidly approaching for 5th grade, and every teacher at every level should be teaching the 6 Traits, so I thought this site would be particularly helpful. Check it out!

      Be sure to pay attention to the following great content on the site:
      Other helpful sites linked to WritingFix include:

      Let me know what you think of the site. Are there other sites about teaching writing you've found helpful?
      (Check out other online literacy resources listed on my "Reading and Math Educational Websites" blog post.)

      Monday, January 25, 2010

      Skyward Review

      The end of the elementary grading period is rapidly approaching. Here are some reminders/updates to help you have success using Skyward Gradebook this time around:
      • Print Cue - IT has added more servers and more print cues to avoid the delay in printing we had last grading period.
      • Safari - Using Safari instead of Firefox has solved the problem of the rows and columns not lining up on the screen. Safari has also been loading Gradebook more quickly.
      • Guided Reading Levels - In order for your GRL's to appear on the report card, we had to assign each level a percentage. The numbers that are now attached to the GRL's don't mean anything. They are only there so the correct levels will appear on your report cards. The percentages will not show up on the report card.
      • Events - You must enter at least one event in each skill area you would like to have count toward the final grade. If you only enter a final grade for a skill area without any events, the subject area grade will not calculate correctly.
      • Points - Grades are weighted by total points. If you want each skill area weighted equally toward the subject are grade, you must have an equal number of points in each skill area.
      Visit the Canyons EMT (Educational and Media Technology) website for Skyward documentation and instructional videos. http://emt.canyonsdistrict.org

      Remember to start entering your grades early! Do a test run of your report cards at least a couple of weeks ahead of time to make sure everything is showing up correctly.

      Your Educational Technology Specialist will not be in your building on your February 26th EBL day due to the UCET conference. Plan ahead and get help early!
      ------------------------------------------------------------------------------
      A few more notes from Help Desk:
      • The explanation of guided reading levels should be correct this term.
      • “M” for modification is an option in all events, skills and subjects.
      • You should also see an option for NA this term.
      • 5th and 6th grade report cards should show the explanation in the number boxes at the top for the letter grades A,B,C, etc.
      • If you have any trouble running reports or with blank fields again, please contact Help Desk or you Ed Tech.

      Monday, January 18, 2010

      Simple Teacher Websites

      There are many options available to teachers who want to create a website for the class/classes. Here are a few options my colleagues and I have tried:

      My UEN
      • Free
      • Utah teachers automatically have a my.uen account
      • Pre-set template
      • Fast, easy to use
      • Simple design
      • Content entered into boxes on the page
      • Tabs to navigate to multiple pages
      • Links to lessons on uen.org

      Blog (I have always used Blogger, but there are many options for blogging.)
      • Free
      • Linked to your Google account
      • Choice of templates, or create your own if you know html
      • Can edit html
      • Simple, one-page design
      • Content entered in as posts or on side-bar
      • Multi-media

      Wiki (I have always used Wikispaces.)
      • Free - educators can get a free account without advertisements
      • Create as many wikis as you want with the same account
      • Choice of templates, or create your own if you know html
      • Can edit html
      • Multiple-page design
      • Content entered onto separate pages that can be linked
      • Navigation bar on each page
      • Multi-media
      • Upload documents
      • Formatting of text can be a little challenging at first

      iWeb
      • Pay through MobileMe account
      • Limited amount of space
      • Design your own layout
      • Similar interface to other iLife applications
      • Multiple-page design
      • Content entered like a Pages document - your choice of design/layout
      • Multi-media
      • Quickly draws on items in iPhoto and other iLife applications
      • Upload documents

      Google Sites
      Google Sites is fairly new, so I haven't actually tried it yet. I have seen it, though, and it looks simple and really great. If you have used Google Sites, please comment and let me know what you think.

      Dropbox
      I have had several colleagues recently tell me that Dropbox can make a nice, simple website too. Comment if you know more about it!

      What have I missed? What are the pros and cons of each of these tools? Are there other ways you are creating quick and easy-to-manage teachers websites? Please comment.

      I have decided that each of these tools are useful in their own way. If a teacher is looking for something that is quick and easy, I recomment my.uen. I have loved using a blog to have students contribute with their own posts, pictures, links, and movies. But, my favorite for classroom management has been a wiki. I like that I can have several pages, each for a specific purpose (information about me, parents, homework, students work, calendars, content areas, etc.), and I love that I can upload documents (worksheets, permission slips, donation lists, assignment outlines, class rules, etc.).

      Here are examples of my teacher websites:
      My UEN: http://my.uen.org/myuen/77889
      Blog: http://bluntsixth.blogspot.com/
      Wiki: http://bluntclassroom.wikispaces.com/

      Friday, January 8, 2010

      New NetSafe Videos

      UEN has new free online videos and public service announcements available to watch and download to help teach kids safe Internet use. Check it out:

      http://www.netsafeutah.org/index.php

      Also available on Nut Intuit:

      http://www.nutintuit.com/Default/

      Tuesday, November 17, 2009

      Podcasting

      This is an outline of my podcast training. It contains the movies and links that were used and discussed during the training. As soon as it is edited and published, I will add a link to the podcast of the training. (Imagine that! A podcast about podcasting!)

      Samples

      • All About Me
      • Prison Blues
      • Willow Canyon Wonders
      • iTunes
      Basics
      • What is a podcast?
      • Podcasting in Plain English:


      • What are the “rules” for podcasting?
      1. Regularly scheduled - every week? every month?
      2. Short segments - 10 minutes?
      3. Audio bumpers between segments
      4. Variety
      5. Be organized and prepared.
      6. Have a plan.
      7. Have fun!
      Planning
      • Storyboarding
      • ComicLife
      • Examples:


      Starting a new project


      Voice


      • Recording
      • Microphones: internal mic, snowball mic
      • Editing & moving clips
      • Special Effects
      Photos


      Jingles/Songs


      Movies


      • It’s one or the other - pictures or a movie - not both.
      Publishing
      • Standard intros and extros
      • iTunes U
      • Websites, blogs, wikis
      Copyright
      • Fair Use Policy
      Parent Permission

      Thursday, October 29, 2009

      Reading and Math Educational Websites

      Reading and Math Educational Websites

      Reading:
      Math:

      Additional online K-12 teacher resources:
      How to add these sites to the school folder

      As with any other educational technology tool, educational websites should be used as part of a planned lesson to teach core curriculum concepts. For example:
      1. Anticipatory Set - A short activity, dispatch or prompt that focuses the students' attention and ties previous lessons to today's lesson.
      2. Purpose - An explanation of the importance of this lesson and a statement concerning what students will be able to do when they have completed it.
      3. Input - The vocabulary, skills, and concepts to be learned.
      4. Modeling - The teacher demonstrates what is to be learned
      5. Guided Practice - The teacher leads the students through the steps necessary to perform the skill using multiple modalities.
      6. Checking For Understanding - The teacher uses a variety of questioning strategies to determine if the students are understanding.
      7. Independent Practice - The teacher releases students to practice on their own.
      8. Closure - A review or wrap-up of the lesson.

      (Source: Dr. Madeline Hunter http://www.csun.edu/science/ref/plans/lesson_design_hunter.html)

      Example:

      Patterns

      • Core Curriculum: 1st Grade Mathematics, Standard 2, Objective 1
      • Anticipatory Set: Patterns Shape Our World
      • Purpose: identify, create, and label repeating patterns using objects, pictures, and symbolic notation
      • Input: Mathematical language - attribute, repeating patterns
      • Modeling: Eyes on the "big screen"
      • Guided Practice: Polk Dot Shorts
      • Checking For Understanding: Pattern Dots
      • Independent Practice: Kid Pix Patterns
      • Closure: View student project and review concepts and vocabulary learned

      Thursday, October 8, 2009

      Tips and Ideas for the Computer Lab

      Computer Lab Basics

      Computer Care & Use

      • Leave the computers on. If you turn them off, they will have to be booted up by the next class and the techs aren't able to work on them remotely.
      • Mac laptops can typically just be closed and they will go to sleep. Turning them off means extra time for the next group who wants to use them.
      • On Macs you need to quit applications (Command Q), not just close application windows (red bubble).
      • What is the difference between an open application and an open folder? Folders contain files, documents, applications, etc. They can be closed using the red bubble or Command W. Applications are actually software programs you work in (like Word, GarageBand, or iTunes). They need to be quit using Command Q.
      • When do I single-click and when do I double-click? Why does it matter? Double-click to open documents, folders, or applications on your desktop or inside folders. Single-click to open items on your dock. Single-click almost all links when you are on the Internet. Double-clicking on items that only need a single-click can cause items to open when you did not intend them to, can take you to links you did not mean to follow, can submit information twice, and can generally "confuse" your computer.
      • Keyboard shortcuts: Command Q = Quit, Command S = Save, Command P = Print, Command W = close Window. Other keyboard shortcuts can be found to the right of menu items.
      • Projector: Learn how to turn it on and off, connect it to your computer (Macs need an adapter), and remember to turn it off when you're done.
      • School Folder: Create a new folder by going to the "File" menu and clicking "New Folder". I suggest you create a folder with your name, then create a file for each student inside that folder for them to save all their work.
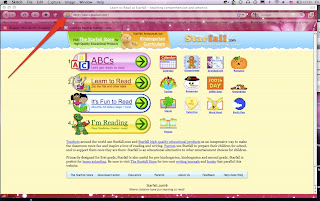
      • You can drag websites to your school folder, too. Click and drag the icon next to the url of the website into your folder. Then the kids can simply double-click on the icon and they're in!
      • To add a picture to an icon you have created in your school folder, find a picture you like on the web, copy that picture, single-click on the icon you want to change, type Command I (I is for Information), Click on the tiny picture of the icon in the information window, then Paste (Command V) the copied picture. Close the information window when you're done (Command W).
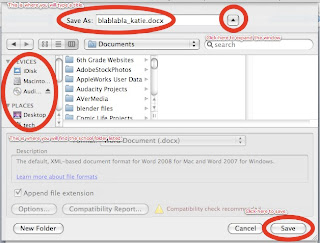
      • Saving: The shortcut is Command S. Have the students click on "School Folder" in the left-hand column of the saving window, then click on your folder, then click on their folder. Now when they click the "Save" button in the saving window it will be saved to their folder. (Hint: If you cannot see the list of files to save to, click the triangle next to the saving title to expand the window.) Practice saving to the school folder with the kids over and over. It takes practice. Save often. Use a consistent file naming system to help find lost items. I like this format: title_name . I don't use any capital letters, spaces, or punctuation.

      Cleaning
      • Computers, keyboards, screens, mice, and counter tops need to be cleaned regularly.
      • Dusting - Swiffer sweepers or Swiffer dusters work very well. Pressurized air cans can help with keyboards and other hard-to-dust computer parts.
      • Cleaning wipes work well for cleaning and disinfecting computer surfaces and keyboards.
      • Computer screen cleaner can help avoid streaks when cleaning screens.
      • Unplug the mouse and keyboard before cleaning.
      • Students can help clean computers if they're taught how.
      • If one person is cleaning, wear gloves and wash your hands when finished!
      • Every class is responsible for leaving the lab straightened and organized after each visit. Push in chairs, pick up pencils and papers, etc.
      Trouble Shooting
      • School Folder: If the school folder is missing, you can always save to the desktop and drag to the school folder. Then, notify tech support which computer was having issues.
      • Finding applications: If you ever have trouble with the dock, you can get to all the applications several other ways. I use the "Go" menu.
      • Occasionally the Internet connection may be down. Have a backup plan that does not require the Internet.

      Management: The computer lab is a classroom too. Rules, routines, and procedures are very important. Here are some suggested rules for your students:
      • Wash your hands! (Imagine all the little hands that touch these keyboards every day, and all the germs that come with them!)
      • Food, candy, gum, and beverages should be kept out of the computer lab.
      • Enter silently.
      • Stay in your seats while working (unless instructed otherwise).
      • Do not disturb switches, cables, or cords.
      • The computer volume stays off unless the teacher tells you to turn it up.
      • When headphones are used, set them to an appropriate volume level. If I can hear what you're playing through your headphones when I'm not the one wearing them, they're probably too loud.
      • Take good care of headphones. Wind up the cords, then hang them or box them up.
      • Focus on your own work. Helping your neighbor is usually a nice thing, but not in the computer lab, unless you have permission. Why? 1) You could be telling them the wrong thing. 2) The teacher can usually help more efficiently. 3) If you always do your neighbors' work for them, they will never learn to do it themselves. Does this mean you can never work together or share? Of course not! But the teacher will let you know when it's time for collaboration.
      • There are talking times and non-talking times. Your teacher will let you know what your speaking volume level should be.
      • Line up after class. Before walking out the door, check to make sure things are better than you found them.
      • The teacher is in charge of getting all copies from the printers. Students should only be near the printers if they have special permission.
      • "Hands off!" is the signal to stop what you're doing, take your hands off the computer, and listen for instructions. (Flickering the lights is the signal when headphones are in use.)
      • Sit on the carpet or turn your chairs when the teacher is presenting on the big screen.
      • Always work at your assigned computer. If the computer doesn't seem to be working, patiently raise your hand and wait for the teacher to either fix the problem or reassign you. (Tip: If your students have class numbers, assign them to the same numbered computers. This helps with accountability for computer care, pushing in chairs, finding lost documents, etc.)

      Best Teaching Practices: The computer lab is a classroom too. Lesson plans and curriculum connections should be used in the lab, just as they are in the classroom. Here are some suggestions:
      For more curriculum ideas, visit the Canyons School District Educational and Media Technology (EMT) website for more links and ideas! Click the link at the bottom titled "Great K-12 Sites".

      Monday, October 5, 2009

      Basic Blogs

      Camille and I have created two presentations to help beginner bloggers. I have previously posted our first presentation, titled Using Blogs to Teach and Learn. (Click here to view it.)
      Following is our second presentation, titled Basic Blogs. We hope they are helpful!


      A few more things:
      • To add more to your blog later, remember to log in at www.blogspot.com using your email address and the password you selected.
      • To direct others to view your blog, tell them to go to your url, which would be http://www.(whatever you chose).blogspot.com
      • Once you log in on blogger, you are taken to the "Dashboard" page. You can change the email address you use to log in, by selecting "Edit Profile" on the left hand column.
      • If you would like to edit the email address where comment or post notifications are sent, click on the "Settings" tab. (See the above slide show for more details.)

      Wednesday, August 26, 2009

      First Day of School

      Today was the first day of school for students for the Canyons School District. A big day! We have all been working so hard to have things ready for today. I have loved being in the trenches and being part of the effort to ensure a great educational experience for our students. I love the team I work with, our department, and our district leaders. Our superintendent is a great leader - caring, intelligent, energetic - and the IT department directors are too. I feel so happy to be part of such a great team.

      Now I am anxious and excited to really get to work with teachers and students. It feels good to work hard, problem solve, and really make a difference. I am working hard to earn the trust of the teachers and principals at my assigned schools. I have loved the teaching and presenting I have done so far.

      First day memorable moments:
      • Wearing a bright yellow district T-shirt and having everyone stare at me all day
      • Sitting in the computer lab working on teacher laptops and looking up in time to see a 2nd grader making funny faces at me as she walked down the hall
      • Talking with the superintendent for 20 minutes and having him genuinely enjoying conversing with me
      • Being able to say hello to my former principal and coworkers as I traveled from school to school
      • Helping a lost 2nd grader find her bus - and her smile when we found it
      • "Thank you"s from teachers when their laptops were returned and ready for use
      • Passionate conversations about how best to help students through good teaching practices and technology use
      • Sharing in everyone's first day experiences via Twitter
      • Jethro puncturing his Coke can with a plastic knife and causing it to explode
      • Liz sharing her ugly stick doll with everyone
      • The enthusiasm and nervousness of first-year teachers
      • Hard-working, dedicated teachers, students, administrators, and district employees
      I feel fortunate and excited to have my new position as an Educational Technology Specialist! I love being a part of the new district! It's going to be a great year!