Saturday, November 7, 2015

Flipped Faculty Meetings

SUECON Presentation
November 7, 2015

Many of us have heard about the flipped classroom in which teachers introduce new material to students as homework in the form of videos and presentations so that they can practice, problem solve, and discuss in person. What if we apply the same concept to faculty meetings? In this session learn how to flip your faculty meeting to save time in presenting the business items to teachers so that your face-to-face time is used more efficiently.


How does a flipped faculty meeting work?
Think about the following when planning your flipped faculty meeting:
  • Decide what information you need to present to your faculty that does not need face-to-face interaction.
  • Decide how you would like to present that information to your faculty.
    • Text
    • Slide presentation
    • Audio recording
    • Video
  • Decide what the best platform is for presenting the information.
  • Be consistent with the platform and procedure you choose.
  • Make sure the information is accessible to teachers. Train them on the system if needed, and make sure they have time to practice with help before sending them out on their own.
  • Provide a way for teachers to give feedback, ask questions, and schedule face-to-face time if needed.
  • Create a way to ensure your teachers are accessing the information.
    • Quiz
    • Survey


Why would I want to flip my faculty meeting?
The idea behind a flipped faculty meeting is to help you are your teachers:
  • Save time and energy.
  • Work more efficiently.
  • Be prepared for face-to-face professional development.
  • Refer back to previous training and information whenever needed.
When they first hear about the flipped faculty meeting concept, many teachers have said, "Doesn't this just create one more thing I have to do on my own time?" It is important to make sure that your flipped meeting is not in addition to the time already set aside for faculty meetings. At our school, we have two one-hour faculty meetings each month. One of the two meetings in now flipped, and one is still face-to-face. The week we have a flipped meeting, the teachers are expected to spend no more than an hour (and it is usually much less time) exploring the flipped information. This is the same hour that was already set aside for faculty meeting, not an additional hour. The teachers are spending the same amount of time - or less - as they would if the meeting had not been flipped, but they are able to choose where and when they spend that hour.

Sometimes the flipped faculty meeting is strictly business. Sometimes it is background information that helps prepare teachers for the face-to-face faculty meeting they have later in the month. Whatever the principal chooses to present, it needs to be presented in a clear, flexible manner to help everyone be more efficient and take responsibility for learning the information.


What tools can I use to flip my faculty meeting?

Check out an example of how we have set up our flipped faculty meetings on Canvas:

Friday, November 6, 2015

Coding with Spheros!

SUECON Presentation
November 6, 2015
4:50-5:50 pm


Spheros are fun, new gadgets that engage students in engineering and coding challenges. Learn the basics of using Spheros in your classroom or tech club.


What is Sphero?
Sphero is the "original app-enabled robotic ball". When paired with apps on your mobile device, you can drive Sphero with a remote control or program it to perform actions, move in patterns, and even change colors. Find more information about Sphero at sphero.com.


What apps do I need to control and program Sphero?


How do I teach using Sphero?
SPRK Education is Sphero's site that supplies teachers with free Core lessons to use with Sphero. The lessons are ready to go with very little teacher preparation. The lessons teach Core concepts, like measurement and geometry, along with coding, engineering, and problem solving. Find the SPRK lessons online at sphero.com/education. Be sure to click on the Core Lessons, Middle School Lessons, and STEM challenges links:


Why should I teach using Sphero?
It's true that Sphero is fun to play with, but when used alongside apps like Macrolab and Tickle, Sphero is much more. It's a fun way to teach basic coding. It is an engaging way to solve STEM problems. And most importantly it sparks curiosity and encourages inquiry-based and problem-based learning.

Saturday, May 2, 2015

Green Screen in the Classroom

ISTE 2014 -- Green Screens in your Elementary Classroom
--Nicole Zubiate - STEM Outreach Center


What is a green screen?
In film and video, a green background can be placed behind subjects being filmed. This allows a separately-filmed background to be added to the final video. Using a green screen is a fun way to enhance any video project. Filming in front of a green screen allows any project to be virtually transported to a new location or setting.

Why use a green screen?
There are many green-screen film projects that can enhance learning in the classroom. Using a green screen can make projects more fun, interesting, and effective. For example:
  • Flipped classroom - Are you filming a flipped classroom instructional video about math? Chemistry? Literature? Film in front of a green screen, then turn your background into your PowerPoint slides, lab demonstrations, or example problems.
  • Instructional process - Filming in front of a green screen can enhance your step-by-step or if-then demonstrations. Film lab instructions, the writing process, or a technology how-to first, then add yourself in later in front of a green screen to point out details and important information.
  • Reviews - Have students virtually jump into book pages, movie scenes, or works of art as they share your insights and opinions.
  • Globalize your classroom - Report or teach while virtually in front of historical events, next to important people, or visiting far away places.
  • Social studies, music, art, dance, plays, storytelling, digital journals - Teaching about the Pyramids of Giza? Studying Monet's Water Lilies? Performing Martha Graham's Appalachian Spring? Why not do it all on location -- or at least use a green screen to make it look like you are on location?
  • Media - Professionals have used green screens to create commercials, public service announcements, newscasts, and weather reports for decades. Give your students the real-world experience of creating their own green screen media productions.
  • Claymation/Stop-motion animation - One of the most difficult things about creating an animation of any kind is keeping your background consistent. Using a green screen can help, and it can transport your characters to imaginary lands. (If claymation interests you, check out the book Fantastic Clay Critters for more ideas.)


How can I get a green screen?
You can purchase green screen kits on sties like buy.com or amazon.com. Some of them come with just the fabric green screen that you can tack to a wall, and some come with accessories like stands, clamps, and lights. If you do not have the money to spend on an actual kit, there are many ways you can get cheaper versions or even create your own:
  • Buy a canvas, paint it with Gesso (a paint primer), then use cheap green tempura paint to color it.
  • Cover a board (wood or strong cardboard) with green construction paper.
  • Purchase a foldout screen from buy.com or amazon.com instead of a full green screen kit.
  • Paint a room green.
  • Tack up green fabric on your wall.
  • Install green fabric on a shower curtain and install a rod so your green screen curtain can be pulled out when needed.
  • Purchase or create a lighting rig, and hang green cloth on it instead of lights.
  • Create a roller to roll the green screen out when needed and up when not needed. Try using an old projection screen. Be sure to attach, roll, and extend the green fabric so that it is tight.

When creating your own green screen, finding the right color is important. The correct shade of green makes it easier for your computer to remove the green and show your chosen background. When looking for potential green-screen fabric, paper, or paint, think of the color of a Sprite bottle for the right color.

Be sure to set up your green screen away from doors, windows, or adjoining walls. You want to avoid noise, uneven light, and interruptions to your filming as well as things or kids that can cause damage to your screen.

Is there a special way to film with a green screen?
You can film green screen footage with any camera, and no special camera settings are needed. It is actually the editing software you use that will remove the green you film and let your chosen background show through instead. There are some things you can do to ensure that your green-screen footage will turn out well:
  • Lighting - Make sure your lighting is even and coming from one type of source if possible. Avoid shadows and multiple light temperatures. For example, if you are filming in a classroom that has overhead lights and lamps, you may want to turn off the lamps so that there are not multiple temperatures of light that can change the color of your screen. Or, if the overhead lights are causing shadows, you may want to turn them off and use only lighting rigs. This, of course, depends on what lighting equipment you have available.
  • Camera shot - Be sure to zoom so that only the area of the green screen is in your shot. If portions of the wall behind your screen are in your shot, they will also show once once you have edited out your green screen.
  • Tripod - Keep your camera steady by using a tripod. Once you have begun filming, do not move your camera until the shot is over unless you want your background to appear to move. It is usually better to keep the green screen footage still, and add moving background footage later.

How do I edit my green-screen footage?
In most movie-editing software, you simply import your green screen footage and whatever photo or footage you want to use as your new background. Place the green-screen footage into your movie project, then place your new background behind it. (The order you place your footage and new background depends on the software.) Your software will then either ask you what to do with the two clips or will show a button to let you decide what to do. Look for a choice that either says green screen or chroma key. Selecting this option will remove any green in your footage and show the new background you have chosen in place of the green. Read your editing software's help manual for details.

Some apps have been created to help make editing green screen footage easier. Some of these apps require that the green screen footage be recorded within the app, while others can import footage from you device's camera or photo library. Some of these apps even have special effects built right in that are already green screen. Check out the following green screen apps, and give them a try:

Monday, May 19, 2014

Why I Choose Pages

You're going to write a blog post about Pages? It's just a word processor, right? How boring!

Not so! Pages is one of my most frequently used computer applications. It's more than just word processing... it's beautifully-designed reports, newsletters, résumés, cards, posters, and more. It's easy-to-use graphic design and publishing capability.

Pages is, "...simple to use, easy to learn and has sharing features that should finally put an end to [your] complaints about friends who are unable to open the documents [you] send them... [Apple] has rethought its approach to the most boring of computer applications — the word processor — with some impressive results. It particularly shines in three areas: appearance, compatibility and sharing." (Shear)

Some features that make Pages my word processing software of choice are:
  • The Pages template chooser offers great designs that are easy to tailor to your own tastes and needs.
  • Menus and options are visual and easy to access using the formatting window (formerly the inspector).

Pages has, "...a contextual panel that slides out from the right. Editing text? Out pops the buttons for bold, font size and justification. Inserting a table? The panel switches to let you modify the rows and columns. Add a picture and you automatically get options for borders and shadows." (Shear)
  • Multimedia is readily available, tied to iPhoto and iTunes.
  • Automatic centering guidelines make arranging the components of projects easy.
  • Sharing and exporting options allow sharing of documents in various file formats so that you can share projects with people who use other word processing programs.
  • iCloud sharing options make your files easily accessible on various computer operating systems as well as iOS devices.
"The new version of Pages introduces an all-new sharing option, powered by the company’s iCloud service, that works remarkably well. Type in a person’s email address, click send, and that person receives a link to your document. When the link is clicked, the document opens in a web browser that looks like a fully functioning Pages application.... The recipient doesn’t have to have Pages installed or have an iCloud account. It even makes Mac-PC sharing easy. The new version runs just fine in Internet Explorer, Firefox, Chrome or Safari on a Windows PC." (Shear)

In case the templates and tools that come with Pages aren't enough, there are many online tools and apps available to enhance Pages even more:

  • The Toolbox for Pages app is available in the Mac App Store and the iOS App Store for free. Toolbox provides extra templates and graphics, some paid and some free, for creating even more Pages projects.
  • Templates Box for Pages is also available on the Mac App Store. It is a bit pricey, but also provides new templates for use in Pages, including Calendar templates.
  • There are a limited amount of free template downloads available from StockLayouts as well as paid membership options. I have found these a little more difficult to use, but it's still nice to have some freebees available.
  • iWork Community is an online community built for sharing free templates created by Mac users who love Pages.
  • And for those of you who can't live without them, here is the link to a template for Avery Labels with Address Book Merge!

For those of you who are less familiar with how to use Pages, following are several resources for learning more about the application:


Not only is Pages great for all the teacher projects you need to complete, it is also great for student projects. Check out these great examples:

  • Posters 

  • Brochures


  • Reading Responses, Notes, Storyboards

  • Reports

  • Newsletters


  • Memory Books


Pages isn't so boring after all, is it? There are many amazing things you can do in Pages, from word processing, to project creation. If you haven't ever given it a try, maybe it's time you do!

Citations:
Shear, Michael D.. "Apple’s Pages, Going the Distance With Word." The New York Times 27 Nov. 2013, U.S. ed., sec. State of the Art: 1-2. Web.

Wednesday, October 9, 2013

Individualized Keyboarding Instruction

I recently sat at a table with a group of middle school social studies and language arts teachers discussing how Google Docs and Chrome Books will be utilized in their classrooms this year. One of the teachers chimed in saying, "Do you know what our incoming 6th graders really need before they get to middle school? Keyboarding skills. Teaching my students to write would go so much more smoothly if they knew how to input their thoughts fluently on a computer."

I couldn't agree more. For several years now I have been tasked with supporting the Canyons School District keyboarding program. I have become convinced that the need for students to be fluent on a computer keyboard has not gone away and will not go away any time soon. In fact, our increased use of computers and other technology devices in education has increased the need for students to be able input fluently on a keyboard.

The Canyons District keyboarding program is outlined on the Ed Tech Department website found at prolearning.canyonsdistrict.org. Teachers in grades 3-6 are required, according to Utah state core curriculum, to teach keyboarding. Teachers in younger grades are encouraged to begin teaching basic keyboarding concepts early, and teachers in older grades are encouraged to review and re-emphasize proper keyboarding technique.

All elementary schools should have begun their focused 20-day Keyboard Chatter instruction on September 3. Read more about Keyboard Chatter here. 6th grade keyboarding teachers are using Keyboard Craze in their classrooms. Read more about Keyboard Craze here.

One of the most challenging aspects of teaching any subject, including keyboarding, is differentiating instruction. In keyboarding, teachers should be evaluating and assessing student keyboarding skills on a regular basis to ensure each student is being challenged to improve first their technique and then their accuracy and speed. Following are several ways teachers can differentiate keyboarding instruction:
  • Use pre-assessments to set individual technique, speed, and accuracy goals for each student.
  • Use a technique name card to celebrate individual technique strengths and correct individual technique problems. (See image)
  • When dictating keyboarding drills, invite those who need to be challenged to try typing each letter or word twice each time you say it rather than just once like the rest of the class.
  • Make a game out of specific mistakes you see students making. For example, one time a line is dictated celebrate students who were able to get all of the commas typed correctly. The next time celebrate students who correctly keyed difficult letter combinations. The next time, celebrate students who were able to get all of the capital letters keyed correctly, etc.
  • Use warm-up software that allows students to progress at their own rate. (Canyons District uses Keyboarding for Kids and Keyboard Mastery.)
In the near future, I will be posting video examples of great keyboarding teachers showing how these techniques and more work in their classrooms. Stay tuned, and keep keyboarding!

Saturday, June 29, 2013

Expand Creativity! Cross-Curricular Music-GarageBand Plus

ISTE 2012 -- Expand Creativity! Cross-Curricular Music-GarageBand Plus
--Antha Holt - Tech Coordinator, McCleary School District
http://garageband4everyone.wikispaces.com/

At the 2012 ISTE Conference I attended a session about using GarageBand to create cross-curricular projects. Antha Holt provided with a lot of resources to help us create digital stories, music, and much more. For starters, here are some of the links and resources we used during the session:
Back channels:
TodaysMeet
Answer Garden
Book:
"Make Music with your iPad" by Ben Harvell
Free App:
SoundCloud

Tools:
GarageBand
Captivate
ScreenChomp
Vambasco.com - downloadable midi files (midi=editable)
Mics:
Mac Mic
Mini Snowflake
Snowball Mic


Using GarageBand in the Classroom

In our session we started with a reminder about The Fun Theory. Basically, the Fun Theory is: Keep learning fun, and students will want to learn more! GarageBand is a great tool for keeping learning fun while still keeping it challenging and relevant. Following are some examples of learning projects students could create with GarageBand:

  • Cross-curricular projects
    • Tie a science, math, or social studies topic into language arts by writing a script to record in GarageBand
    • Tie a project into music by composing a score to go with it
    • Tie a project into art by finding just the right images to go along with the topic you are presenting
  • Collaborate with other communities to have jam sessions and learn more about them in the process
  • Create how-to videos or slide shows about skills and processes being learned in class
  • Create and print books to donate to other communities or countries and record audio books to go with them.
  • Compose music to go along with any presentation
  • Research the culture of a country, state, or anything you are reporting on and compose music that matches
  • Teach math
    • Talk about beats, measures, patterns, fractions, etc.
  • Teach music theory
    • Teach rests by looking at the audio recordings -- Where the rests are you don't see the sound waves
  • Record reading to track and improve fluency
  • Create music that expresses a work of art, color, or shapes
  • Compose movie soundtracks


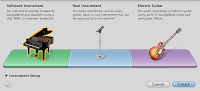
GarageBand for Mac OS

Once you have explored the basics of GarageBand on the MacBook, there are some mid skill level tools and functions that are often overlooked, but very helpful. For example:

On the main screen where you select what kind of project you would like to create, selecting "Loops" gives you a clean slate to start building a new project in.
  

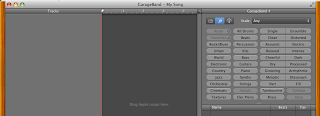
It's usually best to keep the project settings at 4/4 time and in the key of C. When you choose other settings, the offerings are fewer.


Using the + button is a quick way to choose new tracks to add to your project.
 
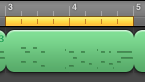
The Scissors icon opens and closes the detail editor. This is very helpful when trimming clips. It also allows you to do more advanced editing with midi files. All of the green music files are midi files. These files can be adjust note by note by clicking on the scissors then clicking and dragging the note markers in the detail editor. You can also view the nots in the score view to see the notation for what you have composed using midi files. The notes in the score can be changed by clicking and dragging as well.

You can change the LCD Modes to view different information about your project.
 

The cycling button allows you to select a specific part of your project and play or record multiple takes. The section of your project that is highlighted with the cycling tool will play until it reaches the end of where you have highlighted, then start over again at your mark.
  

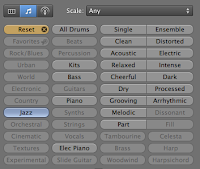
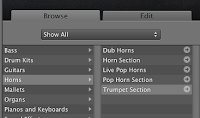
The pre-recorded loops in GarageBand are the key to creating musical scores if you do not play an instrument yourself. There are many instruments and styles of music that you can add to your project.
  

The metronome can be helpful as your pieces together loops and recordings in GarageBand because it plays a steady beat while you're building your creation. It can, however, be disruptive if you record tracks without headphones.


The info pane allows you to change the instrument and effect setting for a track. This gives you a lot more options for personalizing your project. 
  

The media browser is where you can add music from your iTunes library and photos from iPhoto library to your project. You can also add one movie to your project. Keep in mind that you can only add photos or a movie, not both.


There are also many preferences that can enhance your project. You can select the input and output channels for recording and playback, adjust the sound quality in the advanced preferences, and add information about the artist who created your project and the album you want to add your exported project to. This is particularly helpful when you export your project to iTunes.


Each individual track you add to your project has its own set of track controls. By clicking on the triangle on a track, you can access controls to adjust individual track volume, set track fading in and out, and set track panning.


By selecting to show the Master Track you can adjust the Master volume, tempo, and pitch.


GarageBand is a great tool for recording students voices. Students can record singing and speaking and can even change the way voices sound with special effects. When recording, a USB headset with a built-in microphone is recommended because if you record vocals without headphones you will also re-record the music tracks as they play in the background. Headphones allow students to hear the other tracks but still record their own track separately. They also record voices with a better, more clear sound. Once voice tracks are recorded, you can add filters, reverb, and other effects by clicking on the Info button. You can even auto-tune vocals by clicking on the scissors and adjusting the notes shown in the midi file.

Adding photos, a movie, or a slideshow from iPhoto can enhance a GarageBand project even more. You can only add one or the other - photos or one movie or one slideshow. If you want to have still and motion pictures in your project, you will need to import your soundtrack into iMovie. To add photos or movies to your project, choose to create a podcast, click on the multimedia button, and click and drag material to the podcast track. Use the Preview frame to check how your multimedia will look.


Once your project is completed, there are many ways to export and share your creation. You can send your project directly to iTunes if that is where you intend to play your project. Or you can choose "Export Podcast to Disk" to save your project file anywhere on your computer.


GarageBand for iOS

Using GarageBand on the iPad is a little different than on the computer. There are some options for creating music that are really great that aren't even offered on Mac OS. Following are some notes about how to create amazing iOS GarageBand projects:
The settings in GarageBand for iOS are also a little different. Tapping the ? button will show you what all of the buttons do. For example, if you click the Solo button you will only hear that track. You can also control track volume, track pan, echo, and reverb. The wrench button is what allows you to adjust the metronome, add a count-in (always 4 beats), adjust the sound of the count-in, and change the tempo, key, time signature, and fade out. You can also find airplay, help options here.
      When working on projects, you can view your project by instrument or by tracks. You can view track controls by sliding your finger to the right over the track. GarageBand on the iPad defaults to 8 measure loops. Simply click on the + sign to change the length of the loop.

        When recording vocals on the iPad, you can record with sound effects, like on Mac iOS. You can also switch sound effects part way through a recording. You can even create your own sound effects using the Sampler that can then play on the keyboard.

        Smart Instruments - Smart instruments make it easy to create background music with instruments like drums, strings, keyboard, bass, and guitar.
        • Smart Drums - Build your own drum beat by dragging in the desired instrument icons. You can even roll the dice to move your instruments around the grid auto-creating random beats. You can change the drum kit to change the sound of your beats.
        • Smart Strings - Pre-created and customizable string tracks are available that already fit into the key you have selected for your project.

        Jam Sessions - GarageBand on iOS has the capability to create live jam sessions where others can join in and jam with you online.
        Attaching a Camera Connection Kit to your iPad allows you to connect SD cards and USB devices. This is a great way to connect a USB headset or other microphone for recording on your iPad. You could also connect a midi USB keyboard.

        You cannot pull photos or movies into GarageBand on the iPad. The only way to create multimedia projects with the music you create in GarageBand for iOS is to export the music you create, then pull it into iMovie.

        Thursday, October 4, 2012

        The Student Film Festival - A Life-Changing Experience

        ISTE2012 -- The Student Film Festival - A Life-Changing Experience -- Scott Smith - Visalia, CA
        http://www.vusd.org/webpages/ssmith/index.cfm?subpage=27094
        http://slickrockfestival.org/

        In June I was able to attend the ISTE2012 conference in San Diego, CA. One of the sessions I was excited to attend was about building a quality student film festival. Canyons School District has produced a student film festival each year since the birth of the District. In 2012 we were ready to raise the bar and increase the level of involvement, calibre of entries, and magnitude of the festival. We had great success and were inspired to do even more to build our festival in 2013. This ISTE session, "The Student Film Festival - A Life-Chainging Experience," gave me a lot of great ideas for expanding and improving the Annual Canyons District Film Festival to even greater heights. Following are notes and ideas I picked up from this ISTE session that might help you with your film festival efforts as well:

        Why a student film festival?
        • Core academics are strengthened
          • Writing
          • Research
          • Cross-Curriculuar Connection- students write scripts in their ELA class, research issues in their social studies class, and tap the acting and musical talent of students in their schools
        • Generative Skills are developed
          • Executive Skills
            • deliberation, team organization, deadlines, scheduling, managing disappointment
          • Communication Skills
            • know the audience, emotional impact, body language
          • Work Ethic
            • "good enough" is defined by the audience, lives change when students see hard work rewarded
          • Vision Beyond the Ego
            • connection to a local issue, local person, local problem; lives change when students add value to the world
          • Resiliency & Self-Reliance
        • 21st Century Skills are acquired
          • Critical Thinking
          • Creativity
          • Communication
          • Collaboration
        • Dropout Rate Drops
        • Fun is Back
        "In the age of high-stakes testing, the curriculum has narrowed. Compliance now characterizes student learning more often than engagement. Inviting students to be creative and innovative is too rare. Teaching that promotes critical thinking, problem solving and decision making has all but vanished in schools. Juxtapose this culture to the high-energy, creative act of student filmmaking. Fueled by YouTube and inexpensive video equipment, students now have access to a medium that was unreachable prior to NCLB. When students make films, deep thinking takes place. Attention to detail goes way up and new learning sticks. Central to this type of learning is an authentic audience … and that’s where the student film festival comes in." --Scott Smith

        Invite students to find something they love.
        When a student film festival is produced, the following things happen:

        • Standards become clear
          • Clarify the standard, rubric, detailed criteria, quality defined
          • Students realize quality when they see top films from top filmmakers
        • Product is guaranteed
          • A festival means a deadline, the Festival becomes a powerful "nagging" teacher tool
          • Students learn the sometimes hard lesson of deadlines
          • There are closets filled with half-written novels... Films get completed!
        • Student work is validated and celebrated
        • Student achievement increases
        • School culture improves
          • The upside of school is amplified
          • Something good comes from this school
          • The school shakes hands with the community instead of extending the hand for donations
          • Students are engaged in the community and giving to the community, not just asking for support and money
        • School multimedia programs expand
          • From club, to class, to program, to pathway
          • As popularity increases, demand increases
        "Digital filmmaking allows students to share their voice. Too often this voice is limited to the popular student or gifted or advantaged student. The student film festival experience has taught me that students with challenging backgrounds have a rich voice. Working with high-poverty, high-risk students helped me appreciated the level playing field that technology lays. Students of all stripes can make films. Students of all stripes WANT to make films. The student film festival not only affords them the opportunity to make films but it motivates them to make films." --Scott Smith

        Building a Student Film Festival
        • Start with a mission
          • How close to the industry to you want to take the kids?
          • Do you want to focus on an event or issue in the community?
          • What are your production, copyright, and release expectations?
        • Identify existing resources
          • Find the county film commissioner 
          • Contact the county human health services department because they have a lot of money to support the education of health issues in the area. If you can connect your festival to those issues, they can financially back you.
          • Local junior colleges and/or universities - work with their film departments
        • Define the scope of your Festival
          • What grade levels?
          • What's the standard?
        • Market, open up social media channels
        • Establish a brand
          • What is a name that will get people interested/intrigued?
          • Is there a name you can use besides the district film festival?
        • Make a budget
        • Communicate your content expectations
          • Check out the criteria examples used for the SlickRock festival
        • Secure judges - Do you narrow down the entries first? - Each judge is only asked to judge 3 or 4 categories - 4 or 5 judges per category - View the entries before they are sent on to the judges to filter - Phanfare can be used for the judges to view so only the judges know where to go to find the films - Judges' scores narrow down to the top 3 nominees, then hold a dinner to debate who the final winner will be
          • Find local industry people
          • Local film critics
          • TV, news, movies, commercials
          • Online judging
        • Make a to do list and delegate
        • Produce the event and recruit an historian to document it.
        • Post-market to build next year's festival (Strike while the iron is hot.)

        What is the role of the teacher?
        "The teacher’s role in this context is meant to clarify the learning target for the student, to offer frequent descriptive feedback, to expect excellence, and to open 'broadcast channels' so the student’s work is appreciated by a wide audience...
        Digital filmmaking advances academic achievement. In the new Common Core, students are asked to write more toward authentic topics, to persuade, to narrate. Films require a well-written script that defines the characters, the conflict, and the resolution. Films can be narrative stories, persuasive essays, situation analysis, or dramatic/comedic representations. Filmmaking is likely to open cross curricular doors. An issue may be researched in a social studies class, the script written in the ELA class, and acting and music talent is tapped from the arts department. The teacher’s role to frame clear learning targets for each film assignment and offer regular descriptive feedback is vital. But the Festival motivates the task and caps the experience." --Scott Smith

        Examples of Festivals
        • International - ISMF
        • California State - CSMF
        • Regional - SRFF
        • County
        • District
        • School

        FAQ
        • How do you handle submissions with adult themes?
          • Only the adviser can submit a film to the festival for a student.
          • The principal has to sign off on the submission.
          • You can censor and deny films for too much violence or mature themes.
          • Teach the students that they can leave some things to the imagination.
        • What about films that seem to have too much adult help?
          • Have the students sign on their form that it is a student-created film.
          • It still might happen.
        •  Copyright issues?
          • Release forms required for all information, media, and people in the films.
          • Teach the students about copyright.
        • What about the large numbers of entries?
          • Limit the number that can be submitted per school.
          • Play all the entries all day starting at 9am in the large theater.
          • Then have a cycle of limos to bring the kids from a couple blocks away and a red carpet for the awards ceremony.
          • Hire the junior high band to play at the red carpet.
          • The others are there to take photos and greet all the kids coming out of the limos, news crews are interviewing, and younger kids are asking for their autographs as they go in for the awards held in the big movie theater.
          • Get 3 or 4 girls to wear their prom dresses again a second time to hand out the envelopes and awards.
          • Show clips of the nominees and show the complete winner.
          • Pick a time that fits your district's social calendar.

        Ideas for Improving Your Festival:
        • Make commercials for local companies.
        • Music videos - music has to be composed and recorded by the kids
        • PSA - about local issues
        • Foreign Film category - films created by foreign language classes
        • Find the county film commissioner
        • Issues can be a category with specific requirements rather than a theme for the whole festival. ie. The Suicide Prevention category
        • Poster contest for the next year's festival during the current festival - announce the winner of the contest at the current year's festival
        • Hold the festival at an actual theater - try to remove your festival from the school feeling so that it feels like industry
        My teammate Camille Cole and I have presented several times about the benefits of podcasting in schools. The benefits of podcasting parallel the benefits of producing a film festival. If you would like to view the presentation  we created about our podcasting projects, click here. We have also developed an outline of topics that teachers may want to teach their students as they prepare them to create festival entries. You can look over these topics and film examples here.

        The Canyons School District Ed Tech team has already begun preparations for our 2013 film festival. I am excited about the great ideas I picked up from Scott Smith at ISTE and how they will help us improve our festival even more. Check out our website to keep tabs on our film festival and to get information about submitting films! http://prolearning.canyonsdistrict.org/annual-canyons-district-film-festival.html

        Wednesday, July 18, 2012

        ISTE 2012: Engagement Emergencies - Activating the High-Tech/Couch Potato Generation

        --Annette Lamb alamb@eduscapes.com

        Workshop Resources:
        http://eduscapes.com/sessions/emergency

        This summer at the ISTE (International Society for Technology in Education) conference, I attended a three-hour workshop focused on activating students of the "high-tech/couch potato generation." I think a lot of parents and teachers worry about our tech-savvy students doing nothing but sitting and staring at their computers or other electronic devices all day rather than getting up, getting active, and getting involved. This workshop proved to me that using technology does not mean merely sitting. Teachers can and should plan technology-enhanced lessons that get students more active, more involved, more excited about learning, and more in touch with the world.

        VARK (Visual, Auditory, Reading Kinesthetic) and Video - Mix Modalities

        Active Senses + Content with Context + Relevant Technology

        In any technology-enhanced lesson, teachers can give their students a variety of learning experiences, including kinesthetic experiences. The combination of visual, auditory, reading, and kinesthetic learning experiences increases the number of exposures students have to content and allows them to process and repeat it in a variety of ways. For example, when choosing to show a video to introduce new content, a teacher can do more than just have students watch the video. Students can view the video, then re-view the video with specific questions or ideas to focus on, then get up and try what was taught or demonstrated in the video. Try having students use video along with manipulatives and off-computer activities that allow them to demonstrate their understanding. Have students participate in active thinking assignments before, during, and after viewing a video clip to make what they are learning from the clip more relevant, and more clear.

        There are a many great websites that provide free online videos that are perfect for instructing and activating students. Here are a few you might like to check out:


        "Computers are no long just screens and keyboards." Computers are interactive devices now, and they can be used to access information in a variety of ways that activate students. Following are some examples of ways your students can use technology to learn and activate their senses:

        • Auditory: In the Google Chrome browser, students can use the microphone available on google.com to conduct searches by speaking their search term instead of typing it.
          • Activity Idea - Assign each student to research something specific about an animal (what it eats, its habitat, etc.) by speaking their search into the google microphone, then have them verbally share what they have learned with a small group.
        • Visual: In the Google Chrome browser, students can click and drag a photo into the search box on images.google.com.
          • Activity Idea - Give each student an item (ie. money from another country) and have them find out what it is or gather information about it. This would be a great attention-getter that would give students background information before reading a novel, conducting and experiment, or learning about a historical event.
        • Verbal: The Rubber Duck Decoding Theory - Why do we always get better ideas when we're in the shower or the bath or driving in the car? Sometimes we need to get out of the same old scenario where we sit at the computer and stare at the screen while we try to think. Instead of staring at the screen, when students have a problem to solve or thinking that needs to happen, have them talk to a rubber duck. Have them tell the duck the problem or get up and walk around and talk to the duck about possible solutions. Getting out of that same old staring at the screen scenario can help students think more clearly. Verbally explaining the problem and possible solutions or sharing knowledge already gained can help new ideas flow. 
          • Activity Idea - Have students create a video or picture explanation using a rubber duck as the teacher. Have them record themselves using the duck to explain or themselves teaching the duck.
        • More ideas at Annette Lamb's Physical & Virtual Experiences page

        Another way to connect students' technology use to active engagement is to help them make connections between the virtual world and the real world. One way to help them make these connections is by using creative work examples found online and created by others for inspiration, then having students create their own product. Following are some ideas of how online examples can be used as inspiration for student creations:

        • Place: Learn about a place you have only seen in a movie by researching it on the web.
        • Place: Introduce students to online maps like Google street view, Google map-making, and Google trail views. Talk about how the maps were made and how they are useful. Then, have students make their own!
        • Story: Use the Rory's Story Cubes app to generate ideas for a story.
        • Story: Create a storyboard on Storybird, Comic Creator, or other sites.
        • Exhibit: Build a physical exhibit (wax museum, diorama, display board) with a recorded narration to go with it. Use sites like Voki, Vocaroo, or Blabberize to create the narration. Link the recorded narration using a QR code that can be displayed next to the physical exhibit.
        • Exhibit: Use QR code to take a physical exhibit beyond the physical display. Have students create a list of questions to include with their display. Have them create a website that houses the answers to the questions. Generate a QR code to display next to the questions that directs peers to the weblink where they can find the information they need to answer the questions.
        • Video: Have students view online videos, music videos, instructional videos, etc, then have them create their own video projects.
        • Word Clouds: Have students view murals, timelines, infographics, word clouds, and word shapes online, like the Lincoln Douglas Debates, Student Bullying, and The Presidential Timeline. Then have students create their own using sites like Wordle, Tiki-Toki, and Image Chef's Word Mosaic.
        • Data Collection: Have students conduct their own data collection or use existing data sources (Gallup, FedStats) and use online tools (Create A Graph, ChartGo) to organize the results.
        • Interactives: Have students make computer interactives come alive with connected, off-computer activities. Combine hands-on activities with data collection tools. For ideas, check out Thinkfinity activities, Illuminations activities, and Science NetLinks activities.
        • More ideas at Annette Lamb's page about Physical and Virtual Connections
        How can these types of activities really benefit students and increase learning? Technology-enhanced, multimedia learning projects that connect the physical and virtual worlds can provide opportunities for students to entertain, emote, inform, instruct, challenge, engage, provoke, and persuade. Following is a list of each of these skills, ideas for teaching these skills, and learning goals achieved when students practice these skills: 
        • Entertain - visual storytelling, language development, creative writing, diary, re-enactment, speculative project, experiences
          • GOAL: Convey a story, imagine a world, illustrate an idea
        • Emote - show not tell, share insights, connect to emotions, activate a poem, demonstrate traits, convey concepts
          • GOAL: Express a feeling, illustrate an abstraction, move an audience
        • Inform - documentaries, histories, databases, photo essays, represent ideas, categorize, show patterns, share results
          • GOAL: Analyze information, explain causality, visualize ideas
        • Instruct - tutorials, directions, demonstrations, presentations, experiments, procedures
          • GOAL: show strategies, explain concepts, teach others
        • Challenge - present issue, challenge thinking, visual story starters, introduce problems, inspirational examples, extend a story
          • GOAL: create dilemmas, envision problems, kickstart projects
        • Engage - news programs, visual journal, travel logs, yearbooks, highlight programs, create welcomes, showcase work
          • GOAL: announce events, document experiences, reflect on lessons
        • Provoke - PSA (Public Service Announcement), stir interest, influence thinking, impact behavior
        • Persuade - illuminated term papers, advertisements, book/movie trailers, apply advertising techniques, promote action
          • GOAL: support arguments, show perspectives, convince others

        "Our young people risk losing an essential connection with physical reality." - Thomas Elpel
        Teachers can help stop students' disconnect with physical reality by providing a balance between hands-on, tactile experiences and technology-enhanced experiences. Practical, tactile experiences are important for learning and life. Technology can aid teachers and students in the creation of practical, tactile experiences and help make these experiences more richFor example:

        • Paper-based activities: Students get so used to technology that sometimes doing a paper-based creative project is novel and exciting to them.
          • Activity Idea - Go to Dear Photo.com and check out their project. Have your students generate their own Dear Photo project and write a description of their work.
        • Use technology to create a physical product: Use the two worlds together. Technology can enhance our activities as we add the tactile back into what we do.
          • Activity Idea - Create a "Fortune Teller" or a Cube as a review for a unit. Use a template on the computer to create the fortune teller, or assign students to figure out how to format it in a blank document themselves.
        • Dynamic Paper: Use technology to create graph paper, number lines, tessellations, spinners, and other paper-based activities.
          • Activity Idea - Use the Dynamic Paper online app from Illuminations.

        Generate, Motivate, Innovate, Activate
        Generate - When students use technology to "create a tactile story," it can help them explore stories, relationships, and patterns. Following are some resources that can help students generate more tangible experiences and products using virtual tools:

        Motivate - Getting students' attention and helping them see relevance in learning experiences can motivate them to learn more. Technology tools can help increase curiosity in students and add stimulation and variety to their learning through the use of humor, novelty, and a "sense of the unexpected." They can also help students find their niche (explore their own personal interests), see value in their work, and make connections to the real world. Following are some ideas for motivating students by creating novelty in the classroom and by connecting the virtual world with the real world:

        Innovate -"The key to student engagement is involving students in transforming information into something new..." Teachers can use technology to help students think in new and different ways. Students need to be moved beyond copy and paste to create their own innovative projects and problem solutions. Teachers can help students become more comfortable moving "between on-computer and off-computer activities to help students with transformation."

        • Lego is a great example of using technology to create inventive on- and off-computer projects. Check out their site for activities, ideas, and information about Lego Digital Designer and Lego competitions.
        Activate - Games, online and off, are a great way to help students learn. In order to be effective educational tools, games should include four elements. When you create a game, and any lesson, be sure to GRAF it.
        1. Goal. You need a way to win or achieve the goal.
          As educators we need to match goals with purposes and reasons for learning.
        2. Rules. You need to know what you may and may not do.
          As educators, we need to provide guidelines for learning.
        3. Action and Attitude. You must do something along the way. Make it fun and interesting.
          As educators we need to make leanring meaningful and challenging.
        4. Feedback. You need to know how you are doing.
          As educators, we need to provide ongoing opportunities to self, peer, and teacher assessment.
        • Go to the Google Game: Creatures wikispace to try a Google Game.
        • Use a search engine to sort the real Dr. Seuss quotes from the fakes.
        • Find out about the Google April Fools Day jokes that have been done.
        Thanks to Annette Lamb for her great ideas and for reinforcing for me that technology tools are all about activation and creation. For more ideas, check out Annette's Engagement Emergencies Website! http://eduscapes.com/sessions/emergency/index.htm